How to view solar eclipse 2024 with items from around the home (Image Credit: Space.com)
As we get closer to the time of the April 8 solar eclipse, you no doubt have heard with increasing frequency through the mainstream media against looking at the sun with bare eyes, as blindness could ensue. This has given some people the idea that eclipses are dangerous.
Not so! The sun is dangerous. All the time!
There are two main approaches for viewing a solar eclipse and each incorporates one or more methods. The approaches are:
- Indirect viewing, in which you do not look directly at the sun but rather see an image of the eclipse
- Direct viewing, in which you look directly at the sun, but use some type of filtering device to remove or reduce the dangerous radiation before it can enter your eye.
If you cannot get hold of special filtration devices (such as eclipse glasses) in time to watch the eclipse, what follows here are various descriptions using the first approach — watching the eclipse using indirect methods.
Online and television broadcasts
If you are unable to be outdoors to see the eclipse or, if you are in a geographic area where the sky is overcast, you will have to view the eclipse online or on television. In all likelihood, the major networks will dedicate some time to covering this very special celestial event.
You can watch the total solar eclipse live here on Space.com. And keep up with all the actions with our total solar eclipse 2024 live updates blog.
Projectors you can find around the house
Closed Venetian blinds in a window facing the sun may produce rows of images of the sun on the opposite wall, projected through the small holes or openings in the blinds.
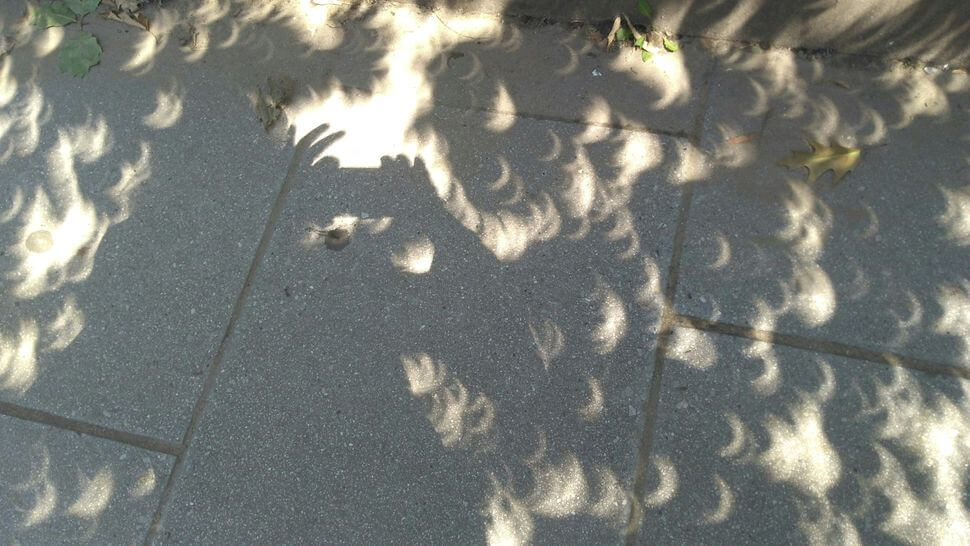
The spaces between the leaves of a well-foliated tree act as small pinholes and will form tiny images of the eclipsed sun that will dapple the ground beneath the tree.

Criss-crossing the fingers of one hand with the other will produce holes beneath which images will be seen on the ground (or preferably, a light-colored background).
You can even use the holes in a straw hat to project numerous small images of the eclipsed sun. In a similar vein, you could try using a colander to project multiple eclipse images. And even the holes found on a Saltine or Ritz cracker will suffice to provide a view of the eclipse.

These projection methods produce many small images with minimal detail. They are interesting to view and photograph but they may not show the detail or size that a viewer might desire. For a better view, use the principles of a “pinhole camera” to put together a simple, but effective viewing device.
Pinhole viewer
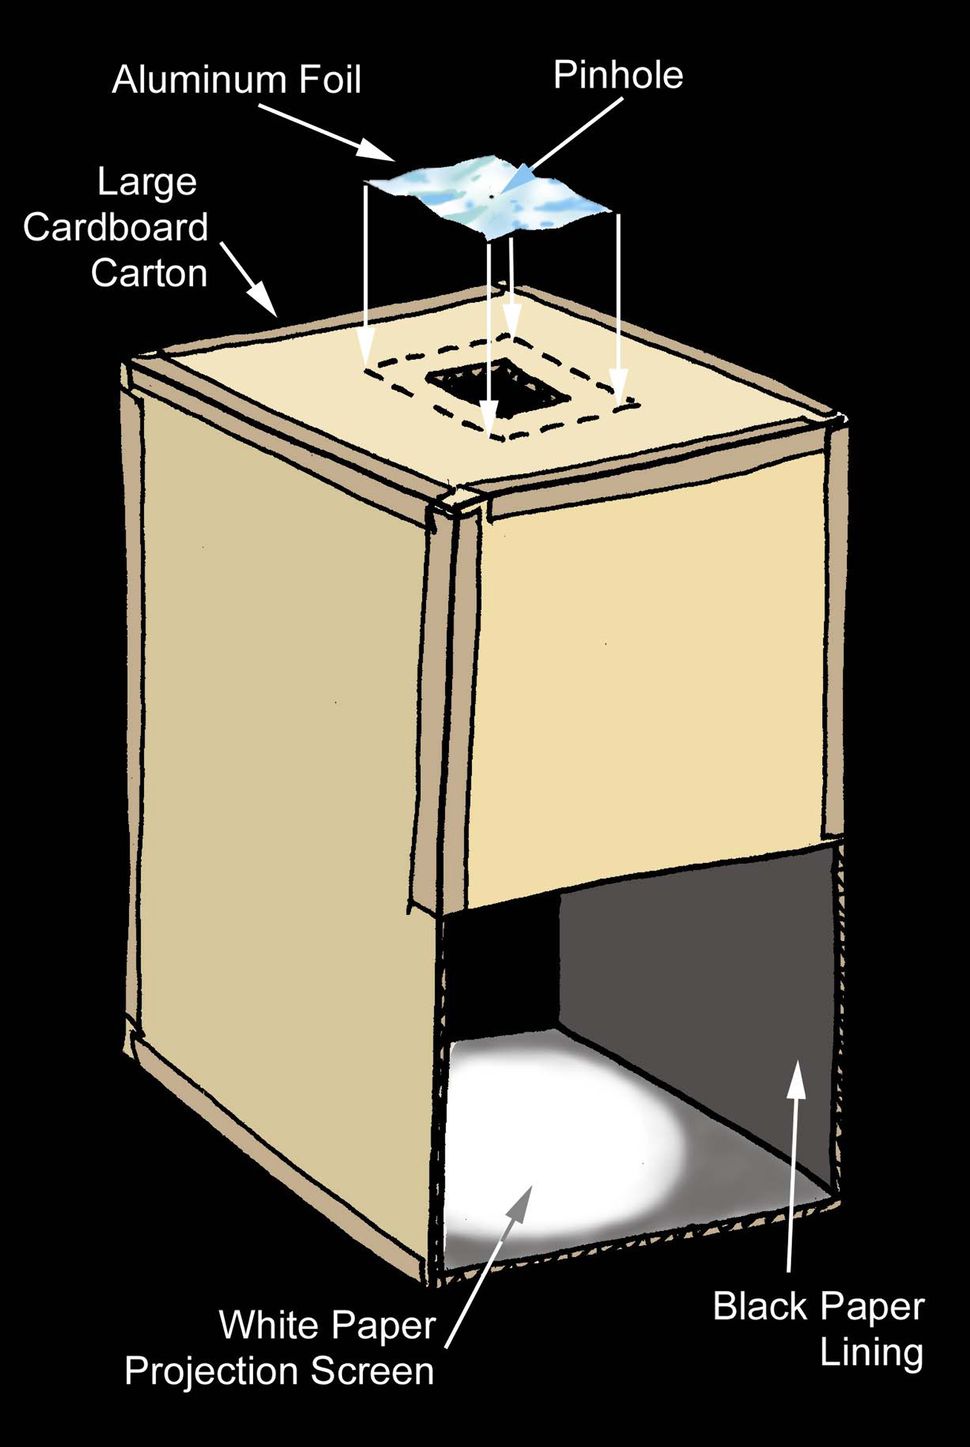
In a piece of aluminum foil make a pinhole about 1 millimeter in diameter (that’s about 1/32 of an inch, half of the 1/16″ that is usually the smallest marked length on a ruler). Use a piece of heavy-duty foil, as it is much more resistant to tearing.

Take a long cardboard box and punch a hole in one end, two inches or so in diameter and place the aluminum foil over the hole, so that light can get through the 1-millimeter hole. Attach a sheet of white (but not glossy white) paper or cardboard at the end of the box to serve as a viewing screen. Cut a hole in the side of the box, so you can look into the box and see the projected image of the eclipse when you stand with your back to the sun and hold the box so that sunlight streams in through the pinhole. Caution: Do not look through the pinhole at the sun!
If the prospect of carrying around a two-foot-long corrugated box all day is somewhat unappealing, a more portable system consisting simply of two sheets of cardboard — in essence only the two ends of the box — can be used. This method also has the advantage of allowing you to adjust the distance between pinhole and screen. Caution: Do not look through the pinhole at the sun!

Typically, the diameter of the projected image formed in such a pinhole system is 0.9-percent (0.009) of the distance between the pinhole and the viewing screen. Thus, if you use a box that is 2 feet long, the image will be between 3/16″ and ¼” in diameter. Making the pinhole larger will make the image brighter, but it will not make the image larger and it will reduce the sharpness of detail in the image.
Mirror projection

An improvement on this age-old viewing method is a “pinhole reflector.” Simply use a flat mirror to reflect sunlight onto a screen, which can be the side of a house or building. If the screen is too near to the mirror, the image will be in the shape of the mirror: but with sufficient distance, a very acceptable eclipse image can be produced. If the “screen” — such as the side of a building — is too dark, hang a white sheet over it. Caution: Do not look directly into the mirror to see the sun’s image!
A mirror two inches square, for example, forms a useable 5½” square image on a screen at a distance of 50 feet.
Resolution (ability to discern fine detail) provided by this very simple method is rather limited. Some improvement can be obtained by cutting a round, dime-sized hole in a (preferably dark-colored) piece of paper and placing it over the mirror to reduce its effective diameter. Used in this way the piece of paper is known as a mask. Making the hole smaller improves the sharpness of the image, but also reduces its brightness. The brightness of the image also decreases inversely as the square of the distance between the mirror and screen; at 100 feet the image is only one-quarter as bright as it is at 50 feet.
A somewhat simpler way to produce a “mirror with a mask” is to cut a dime-sized hole in a brown kraft envelope and put the mirror inside the envelope and put the mirror inside the envelope. Then prop up the envelope and viewing screen and watch the eclipse progress.
To determine the size of the image in the case of mirror projection, use the same rule of thumb as in pinhole projection — the image diameter will be 0.9-percent (0.009) the distance between mirror and viewing screen.
To all of you planning to take in this memorable sky show, good luck and clear skies!


